
| Workflow ends in this panel with the exporting of your developed images. You can export to a file on disk, email, various on-line storage places, a webalbum, or a book template. Tip: you can use Ctrl+E from within the darkroom mode to export. |
|
All settings in this panel can be saved for later reuse. Press the
![]() button to manage your presets.
button to manage your presets.
Where to store your selected images. Different back-ends are implemented, including file on disk, a LaTeX book template and various web albums. Depending on the selected target, you will be asked to give additional information, like filenames, or account name and password.
You can define filenames that darktable generates for export. Several pre-defined variables can be used as placeholders. See Section 10.4, “variable substitution” for an exhaustive list of available variables.
If this option is set to “create unique filename” darktable automatically chooses a unique new file name in case of naming conflicts with existing files. Setting this to “overwrite” forces darktable to exactly adhere to the selected filename template, overwriting any existing files on conflict. This option will present you with a confirmation dialog in order to protect you from accidental data loss. Setting this to “skip” will result in images not being exported when the destination filename already exists.
darktable can export to various file formats. Depending on the output format you can define additional parameters. For some formats you need to decide on the desired bit depth and the compression method, respectively.
For some export formats like JPEG you can define an output quality. Higher values will lead to larger file sizes. The default quality “95” is a good setting for very high quality exports, e.g. for archiving or printing purposes. If you need a good compromise between size and quality, e.g. for online image display or uploads, you should consider a value of “90” instead.
If the file format supports embedded metadata, like JPEG, JPEG2000 and TIFF, darktable will try to store the history stack as XMP tags within the output file. This information can later be used to reconstruct your parameters and settings that have produced the exported image (see Section 2.3.9, “History stack”).
Caution: for various reasons embedding XMP tags into output files may fail without notice, eg. if certain size limits are exceeded. Users are therefore advised to not rely their backup strategy on this feature. To back up your data make sure to save your input (raw) file as well as all of darktable's XMP sidecar files.
If you don't want to distribute history stack data (or any other type of metadata) with your images your can tweak the export metadata configuration.
Exported grayscale TIFF images - either originating from a monochrome camera or after conversion - can either contain all valid RGB channels (default) or just one intensity channel, you can select this in the menu. The second option leads to smaller files but at least some windows printer drivers don't like them.
The exported size can be a size expressed in pixels, a print size in cm or inch, or a scaling factor.
When pixels unit is selected, set the maximum width and height of the output images in pixels. Set both to a value of “0” to export with the original dimensions (after cropping). If the values exceed the original dimensions darktable will either export with the original dimensions or perform an upscaling step, depending on the setting of the following parameter.
When a print unit is selected, set the maximum width and height of the final print in cm or inch and the DPI needed. The corresponding size in pixels is still displayed but not editable in this mode.
When a scale is selected, set the maximum width and height based on a scaling factor of the original size. A scale of 1 will export a file with it's full size. A scale of 2 will export twice the original size if “allow upscaling” is set. A fraction 1/2 or a float like 0.3 can be specified.
If set to “yes” darktable will perform an upscaling step in case the user defined maximum width and height exceed the original dimensions. If set to “no” the exported image's dimensions will not exceed the original ones (after cropping).
If set to “yes” darktable will process the image at full format. The resizing will be done as the very final step. If set to “no” the image is first resized to its final size before being processed.
Only apply to TIFF format. If set to “yes” darktable creates a TIFF layer for every module using a mask (“drawn”, “parametric” or “raster”). Each mask layer is named after the module and contains a black and white image representing the opacity mask as created by darktable.
This defines the output color profile. Select “image settings” if you want the settings in the output color profile (see Section 3.4.1.2, “Output color profile”) module of the individual images to take precedence.
This option lets you define the intent, i.e. the way darktable will deal with out-of-gamut colors. See Section 3.2.6.3, “Rendering intent” for a more detailed description of the available options.
This option lets you choose a style, i.e. a collection of history stack items, which darktable combines with the existing history stack to generate the output image. These history items are only added temporarily; the original history stack is not overwritten. You can use this feature to add processing steps and parameters that you want to be applied specifically to images before export, e.g. you may define a style that adds a stronger level of sharpening when you produce scaled-down JPEG files for the internet or add a certain level of exposure compensation to all of your output images. Learn more about styles in Section 2.3.10, “Styles”, and Section 3.3.4, “History stack”.
When applying a style during export this option defines whether the history stack items of that style replace the original history stack of the image or are appended to it. Technically speaking, in append mode history stack items of the style will constitute separate instances of the respective modules on top of any existing ones (see also Section 3.2.4, “Multiple instances”). As a consequence the original history stack will fully remain in effect with the new items being applied additionally. This way you can apply an overall adjustment (e.g. exposure) to a bunch of exported images while respecting the settings of each individual image.
Pressing this button starts a background job to export all selected images. A bar at the
bottom of the left side panel displays the progress. Furthermore a notification message
pops up reporting the export progress. You may click on the pop-up to make it disappear.
You may abort the export job by clicking on the
![]() icon located close to the progress bar.
icon located close to the progress bar.
Pressing the
 icon
on the right of export button opens a window to configure which metadata are to be embedded
into the exported image.
icon
on the right of export button opens a window to configure which metadata are to be embedded
into the exported image.
Metadata configuration is saved along with other export selected parameters to your favorites presets.
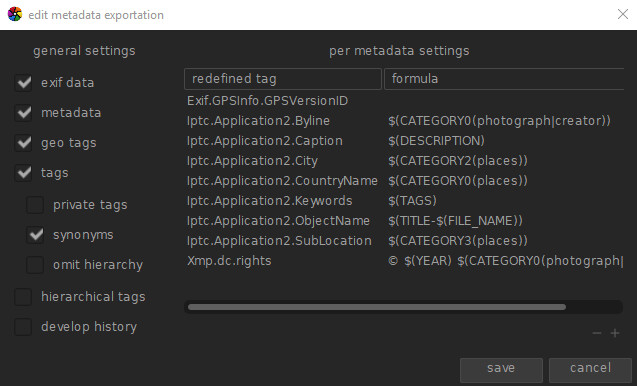 |
The left part lets you select the groups of metadata to be exported. The entry metadata corresponds to metadata defined in metadata editor. Under entry tags you can request the exportation of private tags, synonyms and omit to include the path elements of hierarchical tags. Remember that a tag set up as a category is never exported.
The right part lets you define a formula per metadata entry. What you define here has priority on the left settings. The first column identifies the entry to be edited. The second column is editable and defines the calculation of the metadata entry. Leaving the formula empty prevents the exporting of this specific metadata entry (Exif.GPSInfo.GPSVersionID in the above example). To define a formula, you can use the same variables and rules as for filenames (as documented in the section called “filename template”). Press enter to validate the formula.
Use the “-” icon to remove a metadata entry from the list, the “+” icon to add a new one from the predefined list:
 |
Double-click or click on button add to add a metadata entry to the configuration list.
The formulas allow you to get the most of the tagging function. You can virtually define all the metadata you need to qualify your images in tagging and, thanks to these formulas, export the values in the xmp or iptc tags of your choice. The exported tags can be different from one export to the other depending on the destination of the images. Just remember that tags set as category are not exported. Tags and Categories are displayed separately in image information.
Example 1. A first level tag called places is set as a category,
and is followed by four levels of information (or keywords), country, region, city and location:
places|France|Nord|Lille|rue Nationale.
Each level can be retrieved (when it is defined) by one of the variables
$(CATEGORY0(places)), $(CATEGORY1(places)),
$(CATEGORY2(places)) and $(CATEGORY3(places)).
In that example, the returned values are respectively: France,
Nord, Lille and rue Nationale.
These keywords can also be retrieved as simple tags by the variable $(TAGS).
The last keyword level defined (the leaf) is displayed in Image informations, here rue Nationale.
Example 2. A first level tag called creator followed by the name of the photographer,
both set as category: creator|firstname lastname.
The formula copyrights $(YEAR) $(CATEGORY0(creator)) builds the text associated to image rights.
Image information display in categories the following: creator: firstname lastname.
Neither creator nor firstname lastname appear in tags list;
they are also not exported as simple tags.
Note: tagging is not appropriate to define free text metadata, like a title or a description, which may be specific to each image. Prefer using the metadata editor for this type of information (see Section 2.3.12, “Metadata editor”).


